Monday, April 23, 2012

Week 13, FUN Things and Wrap-up

Welcome to Week 13!

After completing this week, you will have discovered some *fun* web 2.0 online tools!

Thing 21 - Wordle

Wordle is a tool for generating word clouds from text you provide. If certain words appear more frequently in the text, they will appear more prominent in the world cloud. You can change your cloud(s) with different colours, fonts, and layouts. Try it out!

Go to http://www.wordle.net/
1. Click on "CREATE your own"
2. Add text from something you wrote or found on the Internet OR you could enter a URL for a webpage or blog. Try entering your blog address or use our University Library 23 things blog address: http://uofslibrary23things.blogspot.com/
3. Then click on "submit".
4. You can now change the colour, font, layout, etc. for your worldle
5. Print it off!

Thing 22 - LibraryThing


LibraryThing
is an online personal cataloguing system that lets you add your own personal books and connects you to other people who read what you do. You can also see reviews of books or write your own reviews to share with other people.

Go to LibraryThing and try it out! http://www.librarything.com/
1. Become a member by clicking on the "join now" button and filling out the information. Use a creative member name because if you use your surname, it will probably be taken already. Using your NSID works well since that is unique.
2. Verify that you are human by simply typing in the author’s name of the book on the screen
3. Welcome to LibraryThing- you should now be registered!
4. Now you can edit your profile, add books by building your collection, or engage with others using a talk (forum). You can also see various blogs people have done, announcements, reviews, and featured authors.
5. To add books to your collection, click on “Add Books" tab at the top of the page. Then search for the books you want to add by typing in the title or author or ISBN or LC call number into the search box. Your title(s) will appear on the right hand side. Simply click on the books you want to add. From here you can also review your books and add tags to them.
6. If you go back to the homepage, you will notice you have books added to your library. Now there are recommendations given to you for other books you might enjoy (under the books you have added).
7. Now you can see reviews of your books as well!
8. Here are a few useful links to help you use LibraryThing:
• Edit your profile http://www.librarything.com/editprofile.php
• Engage with others http://www.librarything.com/talk
• LibraryThing Groups http://www.librarything.com/groups
• Find friends http://www.librarything.com/findfriends/
9. Have fun!

Optional:

Smilebox is a tool that lets you do quick and easy creative scrapbooking online! Pick your designs and create photos, videos, invitations, e-cards, etc. with your own photos to send to people. It’s free and really fun to use. You can also share your creations using Facebook, your email, a blog, by burning them to a DVD or printing them at home or a store. To use Smilebox you need to download it. It should only take a few minutes to download and there should be no restrictions.
Try it out and have fun! http://www.smilebox.com/

Now Blog! Blog about your experience using these fun tools. Did you enjoy using them? Have you tried other fun online tools? For example: There are a lot of online games out there. Have you tried any?

***Don't forget to mark this week's activity as complete in the 23 Things Work Completed Spreadsheet so you can qualify for our grand prize draw.


Thing 23 - Wrap-up CONGRATULATIONS!! You made it to the end! Now that you are done the University Library 23 Things Program- blog about the program. What did you think? Did you enjoy it? Did you learn anything new? Challenges?

We will be sending out a short survey to everyone who participated- so please fill it out! We would love to hear your feedback.

Thank you for participating in a successful program! Now that we are done- it's time to PARTY!!!

**Don't forget to register for one of the two parties we will be having for "The University Library 23 Things Program" by Friday May 6th. The invitation/registration will come out this week via email- so watch for it! We will be having two parties, so that everyone who participated in the program can attend. The parties will be held on Tuesday May 10th from 10:00am-11:00am in Room 102 & Wednesday May 11th from 2:00pm-3:00pm in Room 102. We will be having cake and you will receive your prize and gift certificate for completing the program. There will also be a draw for two grand prizes!!! See you there!!!!!!!

***Next week will be a catch up week (Monday May 2nd-Friday May 6th) for those who are behind. Don't give up! Please try to complete all "23 Things" and then enter your completed weeks in the spreadsheet.

Monday, April 16, 2012

Week 12, Thing 19 - Online Mapping & Thing 20 - GIS

Welcome to Week 12, Things 19 & 20 After completing Things 19 and 20, you will have…

Learned about Online mapping, GIS, and explored an online mapping tool called "Community Walk." You will have also explored other online mapping tools on your own and discovered more what GIS is and how it’s being used by our library patrons.

What is online Mapping & GIS?

Online mapping tools such as "Google maps" & "Google Earth" have made it easier for people to find their destination quicker without the hassle of buying and then struggling to search a huge paper map. Online mapping tools can be downloaded to individual cell phones for convenient access while driving to a location.

A (Geographic Information System) or (Geospatial information system) is a set of tools that captures, stores, analyzes, manages, and presents data that are linked to location(s) (From Wikipedia.) For example: If you wanted to map certain locations in the world and indicate where a disease is most prevalent in that country, this is possible using GIS software.

In our library, we have a GIS librarian who can help patrons get this type of information. Many units on campus are using this technology for their research, thus the importance of GIS in the library.

Let’s try using a mapping tool called "Community Walk." "Community Walk" is a website that is dedicated to providing a powerful, yet easy interface for creating informational, interactive, and engaging maps. It will create fun maps, as well as professional maps. You can add photos or videos to your map as well. Today we are going to create a fun map! Say you have a friend who has just moved to Saskatoon and loves Indian food. If you want to give him/her a map of all the Indian restaurants in Saskatoon, you can use "Community Walk!"

Step-by-step instructions:

1. Go to the Community Walk website.

2. Click on the login link on the top right hand corner of the page and then on the next page, click on the ‘Register’ link and signup by filling in the required information (make sure you check the box for the terms of service.)

3. Once you have signed up, you have to go to your email and confirm your registration.

4. Once you have confirmed your registration, you should be able to log into Community Walk with your username and password.

Now that you are registered- let's create a map!

5. When you now log in to "Community Walk", it should open to a box that says “[your name’s] maps”. Under the title section on the left hand side of the page, click the “Create New Map" button.
6. It is up to you to decide what type of map you want to create. For example: Create a map of all the Indian restaurants in Saskatoon. You can use this example but try to think of one of your own. (favourite stores, all the Tim Hortons in Saskatoon, etc..)
7. Next, there will be a pop up that asks you "Where do you want to start your map?"Choose a place, e.g. Saskatoon, SK.
8. After typing in your location, click on the "next" button. It will now ask you if your starting point is correct, if so, select it and click on the "next" button. Now decide if your map will be "published" or "shareable" or "private." I would choose “shareable” for now. You don’t want to publish anything at this point. Select "shareable" and click on the "next" button.
9. Add a title to your Map- e.g. “Indian Restaurants in Saskatoon”. Click on the“finish” button. You can change your title anytime- so don’t worry about it too much
10. Once you see the map of Saskatoon come up, "Click here to add your first marker to the map!" link under the Categorized Markers section on the left hand side of the page.
11. Fill in the information when the "Add Marker" box pops up. Put in the title of the first Indian restaurant in the "by searching" section. Type 'India Palace' and then click on the "search" link. When the address comes up, select the correct address. If the address isn't found, you can add your own address by using the rest of the "Add Marker" box options.
12. The next step is to add information about this restaurant when the information box pops up. e.g. Category-Restaurants, Subcategory- Indian food, Description- You can comment about the restaurant and then click on the save button. Now other people looking at your map can also add comments about the restaurants in the "add a comment section". You can also add a photo. To do this, click on "Add photo" button and a pop up will appear. Click on one of the "Browse" buttons and find a photo you want to add. Note: You have to have a photo saved somewhere on your computer before you do this step. Once you have selected a photo, click on the "save" button to upload the photo. If you want to delete the photo, just click on "delete" button. Then click on "back to main view" to edit other content. Note: You might have to hit the refresh button to see the photo deleted on the left hand side of the map.
13. Click on "Add Marker" at the top of the map to add another restaurant e.g. 'Spicy Bite Restaurant'. You can keep repeating steps 11 &12 for how many restaurants you want to add to your map. (Click on the link below to see an example of the map being created)
Community Walk Map - Indian Restaurants in Saskatoon

What else can you do with Community Walk?
14. You can also start a path between all your restaurants to see how far the distances are from each place by clicking on "Start a Path" at the top of the map. You can also share your map with other people by clicking on "Share/Export" tab at the top of the map. This is where you can email your map or look at it in "Google Earth" (see information below). You can also look at your map using the map feature or satellite feature (top right side of the map).
15. Also if you click on one of your locations, e.g. 'India Palace'- you can get directions. Click on the'India Palace' marker. Click on the "from here" link next to "Directions:". Then under the "Ending At:" section, select the “street address with City & State” option. Type in your home address (including street and city). Then click on the “Get directions” button. This will link you to "Google Maps" (see information below) and gives you information on how to get from the restaurant to your house (or visa versa).
16. Once you are finished using "Community Walk" you can save the maps you create and they will be in the "My Maps"section when you log in again.
17. Have fun!

Now Blog!

Blog about your experience using Community Walk or other online mapping tools. Are these tools useful? Do you have any experience using GIS?


Optional: If you haven’t tried Google Maps yet, try it out. Find the directions from your house to the University. http://maps.google.com/ Try adding a Google Map of your hometown on your blog. Here is a YouTube video to show you how to do this.


** You can download Google Earth to your computer (permission might be required at the University Library to download Google Earth so if you can't at work, download it on your home computer) and check out where you live!

***Do you have a mobile device? Check out Locational Apps, such as Foursquare, for your mobile device. Foursquare, Gowalla and Facebook Places are like seeing a facebook status, but with a location attached. When you sign in to a location, you can see where your friends are too. There are fun little games, prizes and coupons with these apps as well to encourage people to sign in to places. They are available as apps for most smartphones. http://mashable.com/2009/12/25/foursquare-gowalla/

Further Reading about GIS…. http://www.gis.com/content/what-gisOr talk with Jasmine Hoover, our GIS Librarian at the University Library.

***Don't forget to mark this week's activity as complete in the 23 Things Work Completed Spreadsheet so you can qualify for our grand prize draw.

Monday, April 9, 2012

Week 11 - Thing 17 - Social Bookmarking and Thing 18 - Widgets

Welcome to Week 11 – Thing 17 - Social Bookmarking
After completing Thing 17
You will have learned about an easy and convenient way to bookmark interesting websites and share them with others using 'diigo'.

Why did we choose to show you diigo rather than the more popular bookmarking web site, Delicious?  Recent news reports have revealed that Yahoo! will no longer be supporting Delicious and is currently looking for a new home for the site.  Because of the uncertainty of its future, we have decided to show you ...


What is diigo?
diigo is a social bookmarking website that allows users save interesting websites and organise them with tags. Because the bookmarked sites are saved on the web, they can be accessed from any computer simply by going to the diigo website and logging in or you can add a diigo toolbar to your browser homepage and manage your bookmarks in diigo from there. (Unfortunately, you will be unable to add the toolbar to your work computer, but you could do this at home.)  What makes diigo attractive to its users is the social aspect. You may think you have found some great web sites and then you tag them, but you are also able to see what other people have bookmarked and see what else they have tagged that may be of interest to you.

Step-by-step instructions

1. The following video will give you a good overview of the features of Diigo.


2. Take a look at diigo and click Get Started Now!. Spend some time discovering the interface using Take A Tour, Groups, and Community buttons on the toolbar.  Or, search for a term that is of interest to you.

Here is a sample search using the term ‘chemistry’ but feel free to search for a term that is of interest to you.
3. Follow another user’s trail. You may discover a wealth of information.

Optional (but recommended)
Sign up and become a diigo user; it's a great way of keeping track of interesting websites, especially if you are someone that works from a few different locations or you want to share links with others.
If you found diigo useful, you might be interested in checking out what’s popular on social media sites that allow users to share items that they find interesting.
There are many of these sites – and everyone from mainstream media (ex. New York Times, the Washington Post, even the StarPhoenix) to blogs and Web sites -- include links so readers can recommend content from these sites to other readers. Look for boxes labeled “Share”,  “Article tools”, or "Follow us" on news sites, blogs, and Web pages to find links for sharing the article.
You might want to take a look at some of the other popular social bookmarking web sites:

  • Delicious is one of the more popular sites with "the freshest bookmarks that are flying like hotcakes".  "The Delicious Home page shows you teh hottest bookmarks on Delicious right now...Delicious has a little of everything, from the best programming tips to the most popular travel sites. 
  • Digg “is a place for people to discover and share content from anywhere on the web… You won’t find editors at [Digg]… provide[s] a place where people can collectively determine the value of content and we’re changing the way people consume information online.”
  • Reddit is a “source for what’s new and popular on the web…We want to democratize the raditional model by giving editorial control to the people who use the site, not those who run it.”
  • Newsvine lets “you…read stories from established media organizations…as well as individual contributors … Placement of stories is determined by a multitude of factors including freshness, popularity, and reputation… editorial judgement is in the hands of the community.”
See a theme here? No editors decide what information is important. The content is user-generated and you and others get to vote on what makes the top lists – the very definition of Web 2.0.

Now Blog!
Create a blog post discussing what you find and what you think of social bookmarking on your blog. You may address any of the following questions.
  • Do you think that using tags is a good way to organize your bookmarks/favorites?
  • Were you able to find sites which you were previously unaware of through diigo?
  • What do you think is the biggest advantage/disadvantage of using diigo?
  • Do you think you will be able to use this in your professional or personal life? Why or why not.

***Don't forget to mark this week's activity as complete in the 23 Things Work Completed Spreadsheet so you can qualify for our grand prize draw.


Welcome to Week 11, Thing 18 - Widgets

After completing Thing 18
You will know more about using Widgets to enhance your desktop and/or personal web pages, or the web experiences of visitors to your sites (such as subject pages, blogs, etc).

What is a Widget?
A widget is a small, stand-alone application that can be embedded into third party sites by any user on a page where they have rights or authorship, such as webpages (subject pages), blogs, or profile on a social media site.  Widgets are fun, engaging, and useful applications that allow users to enhance personal web experiences, or the web experiences of visitors to other's sites.

Widgets are popular with the users of social media who are able to add them to blogs, for example.  Widgets add functionality in the same way that an iPhone/iTouch application does.

You are already familiar with widgets and may not even know it!  Other terms used to describe web widgets include, in the case of Google, a 'gadget'.  We visited this in Week 1, Thing 1 when we created an iGoogle account.  Let's add another gadget that you might find useful.

Step-by step instructions

1.  Add a 'Countdown' widget (gadget) to your iGoogle account.

2.  Enter 'countdown' into the search box on the right hand side.  Choose the countdown that you would like to add to your iGoogle account.
3.  Edit the countdown widget to calculate how much time you have left to complete University Library 23 Things.


Optional
Add more widgets to your iGoogle page.  Browse the list of options by category on the left hand bar or search the web to find gadgets. 
Choose a calendar from this article and try it out. 

Or take a look at Jasmine Hoovers' Mathematics & Statistics' subject page.  She has added a gadget for the Worldcat search box to her page. 

Now Blog!
Create a blog post discussing how you might use a widget to enhance your web page. Do you think it would be useful to you? To others?

Can you think of other gadgets that would be more useful to you? What are they?

***Don't forget to mark this week's activity as complete in the 23 Things Work Completed Spreadsheet so you can qualify for our grand prize draw.


Monday, April 2, 2012

Week 10, Things 15 & 16 - Social Networking and Twitter

2009 Social Network
Image by kasei, on Flickr
Welcome to Week 10, Thing 15
This week, we will take a look at social networking, with a discussion of how libraries use two of the more popular social networking services: Facebook and Twitter. When we get to Thing 16, you will have the opportunity to set up an account on Twitter and try out tweeting for yourself.

What is Social Networking?
An online social network provides a platform for people to create online profiles and connect with people from around the world, thus creating a global network of contacts. These connections are sometimes made via shared interests and activities. The most popular social network is Facebook, as it now has over 800 million active users. Mark Zuckerberg, Facebook's creator, was even named Time magazine's Person of the Year for 2010.

Facebook and Privacy
Lately, Facebook has received a lot of attention in the media due to its privacy settings. With constantly changing privacy settings (see this great infographic on The Evolution of Privacy on Facebook), it is good to be aware of Facebook's Privacy Policy and make sure you have edited your own settings according to your needs. David Lee King, a librarian at the Topeka & Shawnee County Public Library who blogs about libraries and emerging digital technologies, offers a good discussion of the Updated Facebook Privacy Settings and how easy it is to manage your own settings:


Other Social Networks
Facebook may be the largest fish in the pond, but it is not alone. Twitter, a microblogging and social networking service, has almost 500 million registered users and seems to be the best way to receive news as it happens. LinkedIn, with over 150 million users, is especially popular in the business community and is a good place to make job or work-related connections. Some social networks have a topical or special interest focus. This is also known as niche networking. For example, see Dogster, a social network for the dog-loving community. While Facebook might dominate in North America, other networks are more popular in other parts of the world. In China, two of the largest social networks are Qzone, which has about 500 million users, and RenRen, with about 140 million users. Other popular networks include Bebo, Friendster, hi5, Myspace, and Orkut.

One of the trends to watch in 2011 (see #33 in 100 Things to Watch in 2011) is Facebook Alternatives. Many of these alternatives are open source networks that claim to offer more control and personal ownership of one's information. Some of the popularity of these alternatives is also due to the backlash against Facebook's privacy issues. Recently, I was invited to join a friend on Diaspora, a social network with the slogan: "Share what you want, with whom you want", so I can personally attest to this trend of Facebook Alternatives.

Speaking of new developments in the social networking realm, there is a new website called FullyFollow.me that "lets you connect your social profiles into one, and be followed across all of them with a single click." So far, it only provides the basis for connecting your Facebook, Twitter and LinkedIn profiles, but it will eventually add more networks to the list.

facebook
Libraries and Social Networking
The best way for libraries to create a presence on Facebook seems to be via Facebook Pages. See the Murray Library's Facebook Page for an example with which many of us are already familiar. For more examples, check out this list of 10 Great Library Facebook Fan Pages provided by AnnaLaura Brown, an academic librarian who blogs about social networking and libraries. Stephen Abram, on his blog Stephen's Lighthouse, also mentions this particular list, but he adds a few Canadian examples to the list as well. For a few tips on setting up a Facebook Page, check out David Lee King's Facebook Page Tips.

Libraries also use Twitter to promote their services. For example, in the UK, Libraries tap into Twitter in order to raise their profiles and spread information more rapidly. As a point of interest, the Library of Congress announced in April 2010 that they would be digitally archiving the entire Twitter archive--all the public tweets ever tweeted. Watch the following Slideshare presentation for a practical Twitter guide for libraries.
**If you're interested in watching the Common Craft videos in "Plain English" on social networking and Twitter, check out leelefever's channel on YouTube.

Now Blog...
What do you think about social networking? Are you a member of any social networks? If you're on Facebook, what do you like or dislike about it? Do you think Facebook and other social networks are valuable tools for library promotion?

Welcome to Week 10, Thing 16 - Twitter
  ** instructions provided by Christine Neilson


For this Thing you will:

1. Create a Twitter account
2. Subscribe to some Twitter streams
3. Update your blog with your thoughts on Twitter

Twitter is similar to RSS feeds: you subscribe to Twitter streams that you find interesting and short updates are sent to your Twitter account page, rather than having to go through the hassle of tracking down individual updates from a variety of websites. The tweets themselves can be the update, or they can act as a headline for something larger. You can also post your own tweets, but you don’t have to.

To get started:

1. Create a Twitter account at http://twitter.com/ by following the instructions provided on the page. You’ll have to confirm your account in the e-mail that they send to the e-mail address you provide.

Optional: If you like, you can provide a bio and a picture for your Twitter account. You can also customize the way the page looks by clicking on your login name in the top right corner; clicking on “Settings” in the drop down menu; clicking on “Design” in the sidebar menu; and then choosing a new background.

2. Choose some Twitter streams to follow by browsing Categories, Stories, Who to follow, etc. by clicking the #Discover link at the top of the page. Or search for your friends and follow their Twitter streams.

Optional: Post a tweet by clicking on the “Compose new Tweet” link. Remember: these messages are available to the general public, unless you change your settings. To make your tweets private, click on "Profile" at the top of the screen; then "Settings"; then check off "Protect my tweets" beside Tweet Privacy.

3. Whenever you log in to Twitter, you’ll see the latest tweets from the people you follow on the right hand side of the page, and your account information on the left.

Twitter has an extensive Help section that includes a glossary, frequently asked questions, and instructions on more advanced uses of Twitter, like sending private messages to other Tweeters and Tweeting pictures and videos.

What do you think?

Now that you’ve had the chance to look at it, what do you think about Twitter? Update your blog with your thoughts about your experience with Twitter.

Don't forget to mark this week's activity as complete in the 23 Things Work Completed Spreadsheet so you can qualify for our grand prize draw.

Monday, March 26, 2012

Week 9, Thing 14 - Photosharing

Welcome to Week 9, Thing 14 - Photosharing with Flickr


Photo-sharing Web sites have been around for quite awhile, in Internet terms. Flickr (now owned by Yahoo) took the idea of photo sharing and turned it into an online community. Flickr allows users to upload their photos and then share them with family, friends, or the world. Users can “tag” photos with descriptive words and phrases-what librarians would call keywords--to help users identify and search for photos.

More photos than you can shake a stick at
Image  by Darwin Bell, on Flickr
In this Thing, you are asked to take a good look at Flickr and discover what this site has to offer. Find out how tags work, what groups are, and all the neat things that people and other libraries (a list here, too) are creating thanks to Flickr. The Library of Congress has a Flickr account--with more than 3,000 photos that you are invited to tag.

You have two options in this Thing…

A. 1. Take a good look around Flickr and find an interesting image that you want to blog about. You can explore Flickr photos, search the tags, view various groups, and more without a Flickr account.

2. Use any keyword(s) (books, cats, library cats, library signs, whatever…) to find photos with those tags.When you find an interesting image or group, comment on your experience finding images, using Flickr, and anything else related to the exercise. Upload the image to your blog (be sure to credit the photographer). Don't forget to include a link to the image in the post.

-OR- the more fun option

B. 1. Create a Free Account in Flickr (note that Flickr is now part of Yahoo! If you have a Yahoo! account for email or MyYahoo!, log in with that. Or you may also log in with your Google account.).
2. Then use a digital camera to capture a few pictures of something in your library.
3. Upload these to your new Flickr account and tag at least one of the images with U of S Library. Be sure to mark the photo public.
4. Add one or more of your images to your blog. You can add the image in one of two ways:

•Flickr's blogging tool (need a Flickr account to see the button) lets you click the Blog This button (right above the picture) and add any public photo on Flickr to your blog. Be sure to give credit to the photographer, if it is not your photo.
Blogger's photo upload feature lets you add photos from your computer or from the Web and choose the placement in the blog post. Click the little photo icon in the toolbar on the New Post page---it is in the row of tools above the post box. Follow the instructions in the pop up box.

Spend some time exploring the site and have some Flickr photo fun.If you're interested in looking at some other photo hosting and sharing sites, check out Picasa Web Albums from Google or another service called Smugmug.

Keep in mind that when posting identifiable photos of other people (especially minors) get the person's permission before posting their photo in a publicly accessible place like Flickr. Never upload pictures to your Flickr account that weren't taken by you (unless you have the photographer's consent) and always give credit when you include photos taken by someone else in your blog.

Resources

Flickr Learn More tour (6 steps)
•Mediamazine Flickr Tutorials •Keep up with Flickr news via the Flickrblog

More ways to explore:

•Flickr: Popular tags •Interesting- Last 7 days 365 Days of Library Pictures in Flickr

Now Blog!

Share your Flickr-ing thoughts:

•How might you use Flickr?
•Do you use Flickr or another photo hosting service? Which one? How does it compare to Flickr?
•How do you feel about having your photos public (note that you can mark your Flickr photos private, too)--any concerns?

Optional
1. Compare & contrast other photo sites like Picasa or Smugmug or one you use. Which has great features to recommend to the rest of us?
2. Try more of Flickr's or another site's tools to manipulate or organize photos and then tell us about it.
3. Post anything you've done/learned about photo-editing or photo sites on your blog.

Photos add personality and interest to blogs and Web pages. Photo hosting sites like Flickr make sharing photos easy.

Monday, March 19, 2012

Week 8, Thing 13 - Catch-up

Welcome to Week 8, Thing 13

There is no material this week! This is your chance to catch up on anything that you have missed, go back and try out some of the optional things that you didn't have time to do, or just take a break.

See you next week!

saud beach
Image by jessiefish, on Flickr

Monday, March 12, 2012

Week 7, Things 11 & 12 - Wikis, Wikipedia, and the U of S Wiki

Welcome to Week 7, Things 11 and 12!

After completing Things 11 & 12, you will...
Be familiar with the U of S Wiki Tool, and have contributed to the 23 Things Wiki.

What is a Wiki?
A wiki is a Web site that allows users to add and update content on the site using their own Web browser. This is made possible by Wiki software that runs on the Web server. Wikis end up being created mainly by a collaborative effort of the site visitors. A great example of a large wiki is Wikipedia, a free encyclopedia in many languages that anyone can edit. The term "wiki" comes from the Hawaiian phrase, "wiki wiki," which means "super fast." I guess if you have thousands of users adding content to a Web site on a regular basis, the site could grow "super fast." (techterms.com)


The U of S Wiki Tool
The wiki is available to "anonymous" (non-registered) users as well as to "members" (U of S Members and Guests). By using your NSID username and password, or your guest username and password, you can log in as a member of the wiki service. As a U of S member, you will have more editing and contributing access than an anonymous user. Guests will require additional access privileges from wiki owners.

Step-by-step instructions
1. Go to https://wiki.usask.ca/

2. Log-in with your NSID and PASSWORD (top right side of the page)

3. Go to the Wiki documentation home page and browse the various tutorials. The guided introduction to Confluence Wiki software contains some very useful tutorials and instructions.

4. Enter the 23 Things Wiki page and familiarize yourself with the layout. Then, add it to your favourites: Click on Favourite (so the star becomes yellow) under the Tools drop-down menu.

5. Click on the “How Might the U of S Wiki Benefit You? Round 2” child page

6. Contribute to the page by "Edit".

7. Once you have shared some thoughts, remember to click on SAVE.

Now blog! Blog about your experience with the U of S Wiki Tool. Tell us what you particularly liked – and didn’t like - about it. Do you think you will use the tool in the future?

Optional extras
Have a look at Wikispaces or Wikidot to see what they may offer you that's different.


Don't forget to mark this week's activity as complete in the 23 Things Work Completed Spreadsheet so you can qualify for our grand prize draw.

Monday, March 5, 2012

Week 6, Thing 9 - YouTube & Thing 10 - Podcasting

Welcome to Week 6 – Thing 9 (YouTube)


After completing Thing 9
You will know more about video sharing using YouTube, have viewed some fun library content, and shared some content with others.

What is YouTube?
YouTube is a video-sharing Internet website on which all users can upload, share, and view videos, including movie clips, TV clips, and music videos as well as amateur content such as video blogging and short original videos. Most of the content on YouTube has been uploaded by individuals, although some media corporations, such as CBS and BBC, offer some of their material via the site. You must be a registered user with a YouTube account in order to upload and/or share videos, but anyone can watch them.

Step-by-step instructions

To avoid disturbing your co-workers, If you have headphones/earphones, you might want to plug in your headphones/earphones, if you have them, before proceeding with this session.

1.  Explore YouTube and find a video worth sharing with others and/or to add as an entry in your blog.

For example, find a video that you would like to add as an entry in your blog, such as,
Romance of the Living Book
Study Like a Scholar, Scholar
Librarians do Gaga
Ninja Librarian

Or, search for the University of Saskatchewan. My favourites are:
RMR: Rick at the University of Saskatchewan
Weapon of Choice
University of Saskatchewan Learning Commons – A Video Tour

Or, find one that interests you (suitable content).

2.  Try placing the video inside your blog by selecting ‘Share’ from the menu options below the YouTube video screen.


And then 'Embed' from the following menu.


Copy and past the embed code.  The code changes based on your selection.

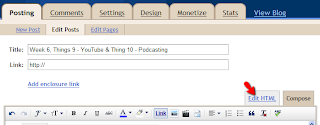
Note: you'll need to use Blogger's Edit HTML tab when pasting this code.


Optional
Try sharing a video by clicking the ‘Share’ button and using one of the share tools available(Facebook; Twitter).


Click on each share option. You will notice that you are required to create an account or sign in to proceed. Go ahead and do that if you would like.
 
Feeling brave?
Make your own video and upload it to YouTube or Google Video.  Find out how:
 
Making and Optimizing Your Videos from YouTube. If you do, be sure to add the link to your blog. We all want to see it.

Now Blog!
Create a blog post about your experience. What did you like or dislike about the site and why did you choose the video that you did? Can you see any features or components of the site that might be interesting if they were applied to the library website?

***Don't forget to mark this week's activity as complete in the 23 Things Work Completed Spreadsheet so you can qualify for our grand prize draw.


Welcome to Thing 10 – Podcasts

After completing Thing 10
You will know more about podcasting, searched some podcast directories to find a podcast that interests you, and added an RSS feed for a podcast to your blog.

What is a podcast?
A podcast is a pre-recorded audio or video broadcast that is distributed over the Internet and can be subscribed to and downloaded via RSS. Podcasts can take the form of interviews, discussions, comedy routines or one-person commentaries. Some are very professional, others less so. There’s a podcast out there for just about every interest area and the best part about this technology is that you don’t have to have an iPod or a MP3 player to access them. Since podcasts use the MP3 file format, a popular compressed format for audio files, you really just need a PC (or portal device) with headphones or a speaker.

The following video clearly explains in 3 short minutes what podcasting is all about.  This video may take some time to download -- please be patient.


How do I listen to a podcast?
Download them to your iPod or MP3 player, or listen to/view them directly on your PC. Check out the Podcasts section on the Apple website.  If you already use Apple's iTunes software, you can download a podcast to enjoy in either iTunes or on any Apple Computers device such as your iPod, iPhone, or iPad.
Note: Because most of us do not have administrative rights to download applications to our work PC's, we recommend that you download iTunes to your home computer.

Where else can I find podcasts?
You might also want to try searching some podcast directories, such as Podcast.com, Podcast Alley, Get a Podcast, or others. See Podcasting News for a Top 10 list of directories.  Most of these directories require that you become a member before allowing you to subscribe. 

Step-by-step instructions

1.  Take a look at one or two of the podcast directories listed above and try to find a podcast that interests you. See if you can find some interesting library related podcasts, such as book review podcasts or library news.

2.  Add the RSS feed for a podcast to your blog, iGoogle or Google Reader.

Optional
Create your own podcast. One of the best known pieces of free software for recording and editing podcasts is Audacity. Audacity allows you to create some technically impressive audio recordings and you don't need anything more than an in-built PC/laptop microphone. However, if you really get into this podcasting lark you probably want to invest in some equipment. Why not give it a go and if you like the end results register it on iTunes or another podcasting service?

FYI, At the University of Saskatchewan, Arts & Science IT, Campus ITS, and Educational Media Access and Production (EMAP) have partnered to provide instructors with an easy to use lecture podcasting service.  As well, Campus ITS has partnered with Apple Computers to pilot publicly accessible University of Saskatchewan podcasting content via Apple's iTunes U service.  For more information, see Podcasting at the U of S.


Now Blog!
Create a blog post about what you thought of the podcasts you listened to/viewed. Do you think you might start subscribing to podcasts or consider podcasting yourself?

***Don't forget to mark this week's activity as complete in the 23 Things Work Completed Spreadsheet so you can qualify for our grand prize draw.


Monday, February 27, 2012

Week 5, Thing 8 - Prezi

Welcome to Week 5, Thing 8

This week you will:
  1. Create a Prezi account
  2. Make a short presentation using Prezi
  3. Optional – check out Slideshare
  4. Update your blog with your thoughts on Prezi
  5. Update the 23 Things Work Completed spreadsheet

Prezi is an alternative to PowerPoint. You can use it to make presentations that include text, images and youtube videos. All your Prezis are stored on the Prezi server, and can be viewed by the general public.
  1. Sign up for a Prezi account

  2. Watch this video tutorial on how to get started (if you want to make the video bigger, you can make it take up your full screen by clicking on the bottom right corner, where you see four arrows pointing outward; to escape from full screen mode, hit the escape key on your keyboard)


    If you prefer, you can scroll down the Prezi getting started page to see written instructions rather than watch the video. There are also additional videos on how to use Prezi at http://prezi.com/learn/.

  3. Make sure you're logged in to Prezi

  4. Click on the “New Prezi” button at the top left of the page


  5. Make a short presentation about music. Make sure that you have each of the following:

    • A title for your presentation
    • Three separate bits of text. Make sure one of them is at an angle.
    • An image of some kind. Clip art will be fine.
    • A youtube video (you insert a video by pasting the url for the video in a text box). If you can’t decide on a video, you can use this one: http://www.youtube.com/watch?v=tgbNymZ7vqY 
  6. View your Prezi show.

Optional:
If you don’t like Prezi but you like the idea of posting your presentation slides on the internet, check out slideshare. Slideshare allows you to upload and share slides made in PowerPoint or Google Docs, and other people can post comments about your presentation.

    Now blog!

    Blog about your experience using Prezi. Do you see yourself using this program in the future? Tell us what you particularly liked – and didn’t like - about it.
    Optionial: post a link to your prezi on your blog so others participating in the University Library 23 Things program can see it


    Important Note for Next Week:

    Next week we'll be discussing YouTube and Podcasts. It could get a little noisy so, if you have them, please be sure to bring headphones so you won't disturb your co-workers.


    Don't forget to mark this week's activity as complete in the 23 Things Work Completed Spreadsheet so you can qualify for our grand prize draw.

    Monday, February 20, 2012

    Week 4, Things 6 & 7 - Google Docs & Spreadsheets

    Welcome to Week 4, Things 6 & 7

    This week you will:
    1. Log in to Google Docs
    2. Create and share a new word processing document
    3. Create a form that's attached to a Google spreadsheet
    4. Update your blog with your thoughts on Google Docs
    Google Docs allows you to create documents, spreadsheets, slideshow presentations, and data entry forms connected to a spreadsheet. The files are stored online so you, and other people with Google accounts that you grant permissions to, can access these files from any computer with internet access.
    Watch this short introduction to Google docs to get an idea of what you’ll see when you get to Google docs.


    If you want more detailed information on how to use Google Docs, Spreadsheets, and Presentations, see the collection of videos “Google Apps: Docs Essential Training” on Lynda.com. Lynda.com is available to all U of S staff via dedicated computer terminals in the Murray library.
    To get started in Google Docs:
    1. Log in to your iGoogle page
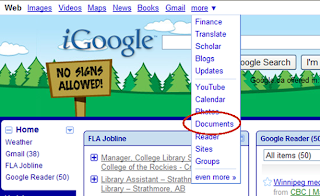
    2. Click on “more” in the list of options at the top of the page, and choose “Documents” from the list

    Documents
    1. Click on the Create New button, and select Document. When your new document pops up, there will be a toolbar at the top that’s similar to the tool bar in Word, and a large blank area underneath that.
    2. Type something in the blank area. Play around with the fonts and other items on the toolbar so that you can see the features it offers.
    3. When you are done, click the Save button in the upper right-hand corner of the page. Then click on the Share button. You will be presented with several options, including the ability to send the page as an email attachment or publish it as a web page. When you share your document with other people, you can set them up as collaborators (co-editors) or viewers. You do so by sending them an invitation to the document via email. Go ahead and send yourself an invitation as a collaborator, using your U of S e-mail address. You will be able to attach a message to the invitation
    4. Now click on the File button. You have several options there, including the ability to rename the document, see the history of revisions, and save the document as a web page. Select “Download file as” and look at the different file formats you can use.
    Spreadsheets

    The Google Spreadsheets program is similar to Excel.

    One feature of Google spreadsheets is the ability to create a form that automatically populates a spreadsheet as people submit information.
    1. Click on the Create New button, and select Form from the list.
    2. The page that comes up allows you to create your form. Give your form a title and, if you like, a short description. Add questions to the form by clicking on the "Add item" button at the top left of the form and selecting the type of question you'd like (for example, multiple choice or typing in text). If you like, you can also change the background by clicking on the "Theme" button and choosing from the options provided.


    Here is an example of a short form made using Google forms/spreadsheets. You can fill it out if you like; Any answers submitted will be entered directly into a Google spreadsheet.


    1. Open the 23 Things Work Completed Spreadsheet
    2. Add your name to the list of participants by clicking on an available cell and typing in your name.
    3. Mark off the weeks that you’ve already completed (including this one!).
    4. Save the spreadsheet by clicking on File > Save
    From now on, once you have completed the assignment for a week, go to the spreadsheet and mark what you’ve completed. To find yourself in the list of participants easier, use the Find function by going to the Edit menu; clicking on “Find and Replace”; typing your name in the “Find” box- leave the replace box empty! – and clicking on the find button below.

    Now blog! Tell us what you thought about Google Docs, and whether you think it has potential as an office tool.

    Monday, February 13, 2012

    Week 3, Things 4 & 5 - RSS Feeds & Google Reader


    Welcome to Week 3, Things 4 & 5 – RSS Feeds and Google Reader
    After completing Things 4 & 5 you will have…

    Learned what RSS feeds are, created a Google Reader account, added a few feeds to your reader (including the University Library 23 things blog RSS feed), explored other RSS feeds and You will also have added the University Library 23 things blog RSS feed to your iGoogle page.

    What is an RSS feed & Google Reader?

    RSS stands for “Really Simple Syndication” and it allows you to view new content from websites, newsfeeds, blog entries, etc. in one place without having to visit the individual sites. When you are looking for websites, newsfeeds or blogs to subscribe to an RSS feed, you will often see an orange symbol to indicate a feed (at top of page). Once you’ve located a feed, you need to subscribe to that feed using a “reader”. The reader we will be using today is “Google Reader”. Now instead of having to go out to various websites, newsfeeds, journal providers & blogs everyday to see the new content, you just have to go to one place- Google Reader.

    Watch these great videos from Commoncraft.com that explains RSS feeds and Google Reader.


    (using RSS feeds)

    (using Google Reader)

    Now that you’ve seen how it works- let’s try setting up a Google Reader account and adding the University Library 23 things blog RSS feed.

    Step-by-step instructions
    NOTE: These instructions are for Internet Explorer. If you are using FireFox or Safari, there will be other options.

    1. Go to Google Reader http://reader.google.com/
    2. Sign into Google Reader using your Google Account (same account you created for your iGoogle account)
    3. Open a new window and leave Google Reader open
    4. Go to the University Library 23 things blog http://uofslibrary23things.blogspot.com/
    5. Look for the orange RSS feed symbol on the right hand side of the page under “subscribe to this blog"section.
    6. Click on “Posts” and from the drop down menu, select "Add to Google."
    7. A new window will open and there will be two options. Select the option "Add to Google Reader" on the right hand side of the page.
    8. Google Reader should automatically open up and subscribe you to this feed. The feeds you subscribe to, will appear in the menu on the bottom left hand side of the page under "Subscriptions."
    9. Now that everyone is subscribed to the University Library 23 things blog RSS feed, let’s try adding one more feed. Leave your Google Reader open and go to http://www.cbc.ca/rss/
    1o. Select the RSS feed you’d like to subscribe to. For example select 'Top Stories' (under the "General News" section).
    11. Click on the orange RSS symbol or link for the feed you would like to subscribe to. Copy the URL from the top of your browser (http://rss.cbc.ca/lineup/topstories.xml) and go back to your Google Reader.
    12. Click on the red “Subscribe” button.
    13. Paste the URL into the box and select the "Add" button.
    14. You are now subscribed to this feed. You will notice the feed under the "Subscriptions" section on the bottom left hand side of the page.
    15. You can now sign out of Google Reader.


    Now to add the University Library 23 things blog RSS feed to your iGoogle page
    1. Sign into your iGoogle page
    2. Open a new window and go to the University Library 23 Things blog
    3. Look for the orange RSS feed symbol on the right hand side of the page under "subscribe to this blog" section.
    4. Click on “Posts” and from the drop down menu, select "Add to Google."
    5. A new window will open and there will be two options. Select the option "Add to Google Homepage" on the left hand side of the page.
    6. Your iGoogle should open and the feed should now have been added to your page.
    7. Blog about your experience using RSS feeds. Do you think this is valuable? Will you use RSS feeds? Is this useful to know working in a library?

    Optional: Try this!!!

    1. Instead of having to go to your favourite websites everyday, see if they have RSS feeds. If they do, add them to your Google Reader. Now you will only have to visit Google Reader instead of a lot of different websites. Think of the time you will save! If you are having trouble finding an RSS feed to add to your Google Reader, here is a link to a directory for RSS feeds. http://ca.feedzilla.com/ .

    2. For those who are really keen.. try adding your own blog RSS feed to your iGoogle page. Go to your blog and sign in. Click on 'Layout' on the left sidebar. On the right hand side, click on 'Add a Gadget'. Scroll down to the gadget "Subscription Links" (you will see the RSS feed orange symbol). Click on the blue + sign and click on the orange save button. Now you will see "Subscribe to" as a gadget on your blog design layout. Click save. When you now view your blog, you will see the new gadget added on the right hand side with the RSS feed orange symbols (subscribe to/posts/comments). Now you can repeat steps 1-6 above, but use your blog instead of the University Library 23 things blog. Have fun!

    Monday, January 30, 2012

    Week 2, Things 2 and 3 - Blogs and Blogger


    Welcome to Week 2, Things 2 & 3 - Blogs and Blogger

    After completing this Thing:
    You will have created your own blog and learned about some of the benefits of blogging.

    Blogging and 23 Things
    In order to record your progress over the course of this program, your final exercise each week will always be to blog about your experience with that week's Thing or Things. Therefore, creating your own blog is a very important first step.

    What is blogging all about?
    For a great introduction to the world of blogging, watch this Common Craft video, Blogs in Plain English:


    As this video discusses, blogging is an interactive way of publishing various types of news and information. Anyone with access to a computer and the internet can start a blog. An individual, a library, an organization, or any other such entity could start a blog. For example, see our library's Library News and Events blog or the iPortal blog. The term "blog" comes from the merging of the words, web and log. A blog usually appears in chronological order, with the most recent post at the top of the page.  For a more in-depth definition and history of blogging, read the Wikipedia entry on blogs.

    Creating your blog
    First of all, if you already have a blog of your own, you do not need to start a new one, unless you would like to. 

    Three of the more popular free online blog hosting services that are easy to use are Blogger, WordPress, and tumblr. We have chosen to provide instructions on the use of Blogger, as it is closely connected to other Web 2.0 tools highlighted in this program. For example, when you customized your iGoogle page in Thing 1, you had to first set up a Google account (or ID); and in order to use Blogger, you will need to log in with your Google account username and password. If you prefer not to use Blogger, you may use a blog platform of your choice.

    Blogger instructions
    1. Go to http://www.blogger.com/ and log in with your Google account username and password.

    If you do not already have a Google account, then click on the Get Started button to create your account.

    After you log in to Blogger, you will also have to choose your Display Name (this can be your own name, or you can choose to be creative with it), enter your birthdate, and accept Blogger's Terms of Service.

    2. Now you need to name your blog (choose a blog title) and choose a unique web address (or URL). Check the availability of your chosen URL before continuing with the word verification. You can use anything you like for the URL, as long as someone else in the world is not already using it. Just keep trying (checking availability) until you find one that works.

    3. Next, choose a template for your blog. You can change your blog's template later on, so do not be worried about being locked into any particular look. *As a side note, Blogger has recently included a new template called Dynamic Views. This advanced template allows your readers to change the way your blog looks or displays, (but they are not able to change any of your blog's content).

    4. You have now created your own blog, so click on the Start Blogging arrow to create your first post.

    ***When you are creating your blog, you may simply be taken to the following page:

    The concept is the same.  This just means you have been taken to the new Blogger interface, and it is letting you choose your blog title, your blog URL, and your template all at once.  Click on Create blog to begin posting.

    Begin Posting
    1. Once again, after you complete each new Thing, you will need to create a blog post about your learning experience. These posts may be as long or as short as you would like.

    2. Blogger has recently upgraded its look (interface), so if you are using the new interface, your Overview page will look something like this:

    Click on New Post, and you will be taken to the posting editor, which looks like this:

    [**To navigate away from the posting editor without publishing, click on Close. To navigate back here from your Overview page, click on New Post. Blogger automatically saves anything you type, but it is saved as a draft. In order to make your post live on your blog, you need to click on Publish. Once you have created a few blog entries, you can click on the Posts button on the left sidebar of your Overview (or the View Posts button at the top of the page) to see a list of your posts. This is where you will be able to edit or delete your posts.]

    3. Now create your first post (or blog entry). Blog about some of your goals and reasons for taking the 23 Things program. What do you hope to learn about? What types of Web 2.0 applications do you currently use or have you used before? Also, since you did not have a chance to blog in Week 1, blog about your experience building your iGoogle page. Do you think you might continue to use your iGoogle start page on a regular basis?

    4. Make sure to include a title. Try out some of the formatting options for your text. **Note: you will also be able to post images and links and embed videos in your blog, but you will learn more about that later in the program.

    5. Before publishing your post, add some labels to indicate what your blog post is about. These labels will help you find your posts later on. Labels (or tags) are like subject headings in a bibliographic record. *As a side note, Blogger uses the term "labels", but you may be more familiar with the term "tags". The two words are synonymous. There will be more on tagging later in the program.

    6. If you want to allow others to add comments to your blog posts, you need to click on Options (on the right sidebar), and click on Allow under Reader comments.

    7. Now Publish your first blog post!

    Further Information
    On the Overview page, you will notice a Blogger Options button (the icon that looks like a gear) on the right side of the screen. If you click on "About our new look", you will find some very helpful videos that discuss Blogger's new interface, such as a video that explains How to publish blog posts.

    Under the Blogger Options button, you can also choose to switch back to the "Old Blogger interface" if you prefer. Keep in mind that because the new interface has a simpler look, it is able to load faster than the old interface.

    Continue to explore your blog and the settings and design options available. On the Overview page, you will see links to Layout and Template on the left sidebar. When you click on Template, you can change the look of your blog. The Customize button will take you to Blogger's Template Designer.


    Further Reading
    Why I Blog by Andrew Sullivan (Atlantic Magazine, Nov 2008)
    The Bloggers Among Us by Meredith Farkas (Library Journal.com, Dec 2007)
    Why and How to Use Blogs to Promote Your Library's Services by Darlene Fichter (Information Today, v.17 no.6 Nov/Dec 2003)
    Blogs for Libraries by Greg Schwartz (updated May 2010)


    Welcome to Week 2, Thing 3 - Registering your blog

    After completing this Thing:
    You will have registered your blog with the University Library 23 Things program and learned more about the interactive and social side of blogging.

    Register your blog
    Now that you have created your blog, you will need to register it with this 23 Things program. This is mostly for your own benefit, so that you will be able to interact with other participants in the program. We will likely not be able to visit each of your blogs every week due to time constraints, but we look forward to hearing some of your experiences as you participate in 23 Things. (Note: starting in Week 4, you will be asked to mark off your completion of each week's Thing, by marking an 'x' in a Google Spreadsheet. See the FAQs for more information.)

    Hello!  My URL Is...
    Image by vasta, on Flickr
    In order to register your blog, please send us an email at uofs23things@gmail.com. In the subject line, include "Register my blog" and your name. In the body of your email, include (1) your name, (2) your NSID, (3) your blog title, and (4) your blog URL.

    Once we receive your blog registration, we will add a link to your blog on the right sidebar of this blog. This may take a few days, so please be patient. When all the participants' blogs have been linked to this one, you will be able to view each others' blogs and comment on them.

    Blogging and comments
    Your blog is now available on the Internet and is essentially your public voice, so be aware of what content you wish to share with the online community. (Note: in your blog Settings, you have the option to not include your blog in the search engine listings. If you choose this option, your blog is still available on the Internet, but it is not searchable - via Google, for example.)

    One of the defining features of Web 2.0 applications is that they are interactive and social. When you visit each others' blogs, you can click on the comments link at the bottom of each post, and thus put into practice the social side of blogging. In order to allow others to comment on your blog posts, you will need to ensure you have enabled Reader Comments under the "Post Options" link.

    You will also need to adjust the Comments settings under the Settings tab. There are three main things to consider here. First, at the top of the Comments settings page, click on "Show" as opposed to "Hide". Second, under "Who Can Comment?", I would recommend choosing Registered Users (anyone who is able to log into Blogger). And third, you will need to decide if you want to moderate comments. It seems unlikely that you will experience comment spam from outside sources, so I would recommend clicking on "Never" or "Only on posts older than...". This way, when we comment on each other's blogs, it will make the leaving of comments more satisfying because the comments will show up immediately.

    Read the following article discussing the pros and cons of allowing reader comments on your blog: Do You Blog With the Comments On?. This article is written from the point of view of a small business owner, but it is just as valid in today's library culture.

    Now Blog!
    What do you think about interacting with an online community via a blog? Have you had any experience with blogging, and have you had the opportunity to use blogging while working in a library? Also, do not forget to include the labels, Thing 3 and Week 2.