

Welcome to Week 2, Things 2 & 3 - Blogs and Blogger
After completing this Thing:
You will have created your own blog and learned about some of the benefits of blogging.
You will have created your own blog and learned about some of the benefits of blogging.
Blogging and 23 Things
In order to record your progress over the course of this program, your final exercise each week will always be to blog about your experience with that week's Thing or Things. Therefore, creating your own blog is a very important first step.
What is blogging all about?
For a great introduction to the world of blogging, watch this Common Craft video, Blogs in Plain English:
As this video discusses, blogging is an interactive way of publishing various types of news and information. Anyone with access to a computer and the internet can start a blog. An individual, a library, an organization, or any other such entity could start a blog. For example, see our library's Library News and Events blog or the iPortal blog. The term "blog" comes from the merging of the words, web and log. A blog usually appears in chronological order, with the most recent post at the top of the page. For a more in-depth definition and history of blogging, read the Wikipedia entry on blogs.
Creating your blog
First of all, if you already have a blog of your own, you do not need to start a new one, unless you would like to.
Three of the more popular free online blog hosting services that are easy to use are Blogger, WordPress, and tumblr. We have chosen to provide instructions on the use of Blogger, as it is closely connected to other Web 2.0 tools highlighted in this program. For example, when you customized your iGoogle page in Thing 1, you had to first set up a Google account (or ID); and in order to use Blogger, you will need to log in with your Google account username and password. If you prefer not to use Blogger, you may use a blog platform of your choice.
Blogger instructions
1. Go to http://www.blogger.com/ and log in with your Google account username and password.

If you do not already have a Google account, then click on the Get Started button to create your account.
After you log in to Blogger, you will also have to choose your Display Name (this can be your own name, or you can choose to be creative with it), enter your birthdate, and accept Blogger's Terms of Service.
2. Now you need to name your blog (choose a blog title) and choose a unique web address (or URL). Check the availability of your chosen URL before continuing with the word verification. You can use anything you like for the URL, as long as someone else in the world is not already using it. Just keep trying (checking availability) until you find one that works.

3. Next, choose a template for your blog. You can change your blog's template later on, so do not be worried about being locked into any particular look. *As a side note, Blogger has recently included a new template called Dynamic Views. This advanced template allows your readers to change the way your blog looks or displays, (but they are not able to change any of your blog's content).

4. You have now created your own blog, so click on the Start Blogging arrow to create your first post.

***When you are creating your blog, you may simply be taken to the following page:

The concept is the same. This just means you have been taken to the new Blogger interface, and it is letting you choose your blog title, your blog URL, and your template all at once. Click on Create blog to begin posting.
Begin Posting
1. Once again, after you complete each new Thing, you will need to create a blog post about your learning experience. These posts may be as long or as short as you would like.
2. Blogger has recently upgraded its look (interface), so if you are using the new interface, your Overview page will look something like this:

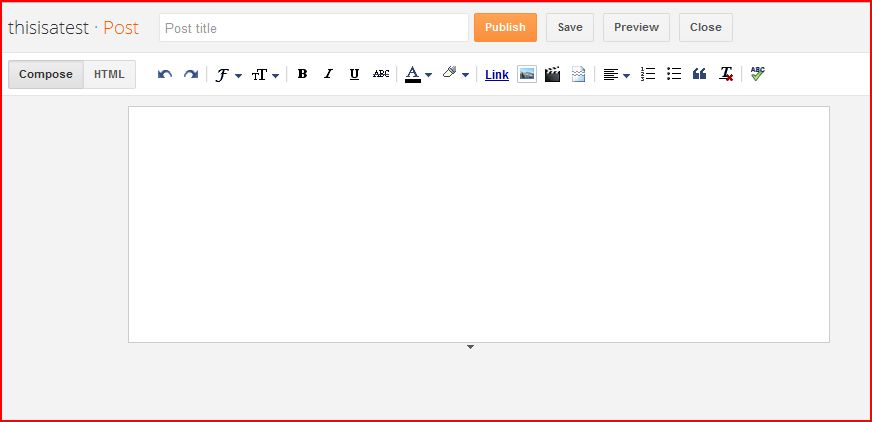
Click on New Post, and you will be taken to the posting editor, which looks like this:

[**To navigate away from the posting editor without publishing, click on Close. To navigate back here from your Overview page, click on New Post. Blogger automatically saves anything you type, but it is saved as a draft. In order to make your post live on your blog, you need to click on Publish. Once you have created a few blog entries, you can click on the Posts button on the left sidebar of your Overview (or the View Posts button at the top of the page) to see a list of your posts. This is where you will be able to edit or delete your posts.]
3. Now create your first post (or blog entry). Blog about some of your goals and reasons for taking the 23 Things program. What do you hope to learn about? What types of Web 2.0 applications do you currently use or have you used before? Also, since you did not have a chance to blog in Week 1, blog about your experience building your iGoogle page. Do you think you might continue to use your iGoogle start page on a regular basis?
2. Blogger has recently upgraded its look (interface), so if you are using the new interface, your Overview page will look something like this:

Click on New Post, and you will be taken to the posting editor, which looks like this:
[**To navigate away from the posting editor without publishing, click on Close. To navigate back here from your Overview page, click on New Post. Blogger automatically saves anything you type, but it is saved as a draft. In order to make your post live on your blog, you need to click on Publish. Once you have created a few blog entries, you can click on the Posts button on the left sidebar of your Overview (or the View Posts button at the top of the page) to see a list of your posts. This is where you will be able to edit or delete your posts.]
3. Now create your first post (or blog entry). Blog about some of your goals and reasons for taking the 23 Things program. What do you hope to learn about? What types of Web 2.0 applications do you currently use or have you used before? Also, since you did not have a chance to blog in Week 1, blog about your experience building your iGoogle page. Do you think you might continue to use your iGoogle start page on a regular basis?
4. Make sure to include a title. Try out some of the formatting options for your text. **Note: you will also be able to post images and links and embed videos in your blog, but you will learn more about that later in the program.
5. Before publishing your post, add some labels to indicate what your blog post is about. These labels will help you find your posts later on. Labels (or tags) are like subject headings in a bibliographic record. *As a side note, Blogger uses the term "labels", but you may be more familiar with the term "tags". The two words are synonymous. There will be more on tagging later in the program.
6. If you want to allow others to add comments to your blog posts, you need to click on Options (on the right sidebar), and click on Allow under Reader comments.
7. Now Publish your first blog post!
Further Information
On the Overview page, you will notice a Blogger Options button (the icon that looks like a gear) on the right side of the screen. If you click on "About our new look", you will find some very helpful videos that discuss Blogger's new interface, such as a video that explains How to publish blog posts.
Under the Blogger Options button, you can also choose to switch back to the "Old Blogger interface" if you prefer. Keep in mind that because the new interface has a simpler look, it is able to load faster than the old interface.
 Continue to explore your blog and the settings and design options available. On the Overview page, you will see links to Layout and Template on the left sidebar. When you click on Template, you can change the look of your blog. The Customize button will take you to Blogger's Template Designer.
6. If you want to allow others to add comments to your blog posts, you need to click on Options (on the right sidebar), and click on Allow under Reader comments.
7. Now Publish your first blog post!
Further Information
On the Overview page, you will notice a Blogger Options button (the icon that looks like a gear) on the right side of the screen. If you click on "About our new look", you will find some very helpful videos that discuss Blogger's new interface, such as a video that explains How to publish blog posts.
Under the Blogger Options button, you can also choose to switch back to the "Old Blogger interface" if you prefer. Keep in mind that because the new interface has a simpler look, it is able to load faster than the old interface.

Further Reading
Why I Blog by Andrew Sullivan (Atlantic Magazine, Nov 2008)
The Bloggers Among Us by Meredith Farkas (Library Journal.com, Dec 2007)
Why and How to Use Blogs to Promote Your Library's Services by Darlene Fichter (Information Today, v.17 no.6 Nov/Dec 2003)
Blogs for Libraries by Greg Schwartz (updated May 2010)
 |
No comments:
Post a Comment